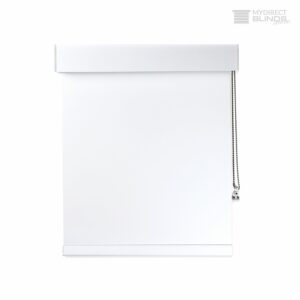


Description
Top Cassette is 101mm high x 90mm depth
Side and Bottom Channels are 50mm wide and 20mm thick
Cassette Finish:
- Full Cassette – 100% blackout, bottom channel will feature a steel lathe insert for quiet operation.
- Cassette with no bottom channel (Top and Sides Only) – Features a flat base rail at the bottom of the blind (Ellipse base rail is not compatible). Base rail will feature felt on bottom to help with light blockage. Small amount of light seepage at the bottom if installed on the face. This option will be close to 100% blackout when installed in the recess of the window, the end user can also install a timber quad behind the base rail if needed to help with any potential light seepage.
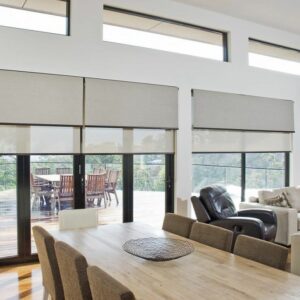
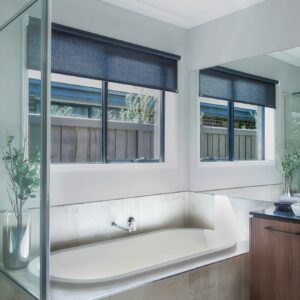
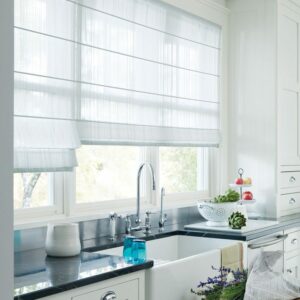
Can be recess or face fitted within your window opening
Other features: Can be left or right chain controlled. Roller Blind can also be motorised.
Comes in three colours: Anodised, White and Black
100% light blocking encloser with the full cassette option
Designed for today
Stylish, modern square-lined shape
Metal end covers are perfectly matched to the finish of the headbox and side channel profiles
Closure problems caused by excessive powder coast build-up are a thing of the past. The unique clasp design between the front and rear cassette profiles ensures ease of assembly no matter how much power coat has been applied. Even if sections have been double coated for colour change
A center bracket is available for the cassette, allowing dependent or independent multi linked blinds to be readily installed inside the single cassette box – no joins, less light entry and easier installation. A Common headrail cassette will be made as one piece to cover both blinds, with side channels in the middle for linked blinds.
Please note: Outside opening windows should not be opened while cassette blind is fully down, as wind can damage the fabric/blind.
Tip:
For Internal/Recess Fits Note: Side Channels will need to be installed square and properly slotted into the top of the headbox to stop light seepage. If they are installed flush to the sides of your windows then this will create larger gaps between the internal side channel and edge of fabric, creating light seepage. There is a 2mm deduction made so that the full cassette fits into your opening, so your internal build up may be necessary.
For windows that are out of square, this can cause the side channels to not sit in the headbox properly, as they are made slightly smaller to fit into the window opening, you will need to lift the bottom channel up by a few mm’s, so you will need to create your own timber build out where the channels can sit onto, where they aren’t sitting along your out of square window which will contribute to light seepage. We always recommend a face install for the cassette blinds for ease of installation, as the difficulty in installing recess fits is significantly higher.
Ensure your blind is properly slotted into your brackets and not telescoping. To fix a telescoping issue which can be caused by out of square install of the brackets and internal window, check this section here.
Consult the measuring page here.
For (inside window opening) recess fits with cassette and side channels only, measure as per regular roller blind measurement instructions. Use this same measurement for your cassette and roller blind.
For (inside window opening) recess fits with full enclosure cassette (including bottom channels), measure the width of the window opening (in mm’s) in three spots (very top, middle, and very bottom), and use the smallest of the three measurements. Then measure the height of the window opening (in mm’s), in three spots (far left, middle, and far right), and use the smallest of the three measurements. Use this same measurement for your cassette and roller blind. Do not make any further deductions from your taken measurement.
For recess fits, you will need at least 50mm of depth from the nearest obstruction to the front of the window opening. If you have less than 90mm of depth, that will mean the headbox will protrude into the room slightly, but will not detract from the look of the product. The headbox features side covers.
Tip:
For Internal/Recess Fits Note: Side Channels will need to be installed square and properly slotted into the top of the headbox to stop light seepage. If they are installed flush to the sides of your windows then this will create larger gaps between the internal side channel and edge of fabric, creating light seepage. There is a 2mm deduction made so that the full cassette fits into your opening, so your internal build up may be necessary.
For windows that are out of square, this can cause the side channels to not sit in the headbox properly, as they are made slightly smaller to fit into the window opening, you will need to lift the bottom channel up by a few mm’s, so you will need to create your own timber build out where the channels can sit onto, where they aren’t sitting along your out of square window which will contribute to light seepage. We always recommend a face install for the cassette blinds for ease of installation, as the difficulty in installing recess fits is significantly higher.
Ensure your blind is properly slotted into your brackets and not telescoping. To fix a telescoping issue which can be caused by out of square install of the brackets and internal window, check this section here.
For face fits with a timber architrave around your window, follow the regular roller blind measurement instructions. Ensure you do not have decorative architraves that might interfere with the side channels and headbox sitting flush.
For face fit square set windows (no timber architrave around your window opening), measure the opening and add 101mm on top for the headbox, and at least 50mm on the left, right and bottom for the side channels to sit. If you opt for the top and side only channel system, then you will want to increase the length of the blind that runs past the bottom of the opening to help with light blockage. Ensure you have enough space above for the headbox and around the sides and bottom for the side channels. Ensure you do not have a protruding window sill at the bottom of your window opening.
Our roller blinds must be ordered together with the cassette system, as they fit only our system. It cannot be retrofitted to existing blinds as there are deductions made at the factory so that the roller blind can fit within the cassette, and the base rail is also made shorter for the same reason.
The roller blind must be ordered as an under roll, where the fabric comes to the back and behind the tube for it to be compatible with the cassette system.
Use the same measurement you have taken with these instructions here for your roller blind that will operate within the same cassette and window.
NOTE
Video does not include bottom channel demonstration. If you will be ordering a recess fit with a bottom channel, then the side and bottom channels will be made to a fixed opening measurement and not adjustable to the opening width, as such an approximate 2mm or more overall gap will be present on the width, which you may need a timber build out, in order to achieve full blackout.
For Internal/Recess Fits Note: Side Channels will need to be installed square and properly slotted into the top of the headbox to stop light seepage. If they are installed flush to the sides of your windows then this will create larger gaps between the internal side channel and edge of fabric, creating light seepage. There is a 2mm deduction made so that the full cassette fits into your opening, so your internal build up may be necessary.
For windows that are out of square, this can cause the side channels to not sit in the headbox properly, as they are made slightly smaller to fit into the window opening, you will need to lift the bottom channel up by a few mm’s, so you will need to create your own timber build out where the channels can sit onto, where they aren’t sitting along your out of square window which will contribute to light seepage. We always recommend a face install for the cassette blinds for ease of installation, as the difficulty in installing recess fits is significantly higher.
Ensure your blind is properly slotted into your brackets and not telescoping. To fix a telescoping issue which can be caused by out of square install of the brackets and internal window, check this section here.